Saturday, September 14, 2013

Polar Bear Reproduction

Now I'll be the first to admit that I'm a nerd for being so interested in this kind of topic, but I can't help myself. Anything to do with exotics, and especially if it's conservation related, and I am completely hooked.

Polar bears were listed as threatened by CITES in 2008, meaning that no more wild polar bears could be imported into US zoos. This posed a problem for the zoos, because polar bears do not breed well in captivity. Polar bears have a very high incidence of stillbirths and neonatal death, at least in a zoo setting. Overall, there is only about a 30-40% cub survival rate. Which is obviously not very good. And no matter what your views on zoos are (and I can admit too that my own views on zoos are mixed), I am at least happy that something has sparked an interest in people to look into polar bear reproduction and trying to help save the species.

Currently, there is no way to diagnose of confirm a pregnancy in a polar bear. You can't take a blood sample from a polar bear, and the urine samples are usually so contaminated that they're useless. These are both methods that are used to diagnose pregnancy in humans. We are also able to use ultrasound, something else which is useless in polar bears. You can go ahead and ultrasound a polar bear, but you're not going to see anything. The abdomen is just way too big, and their uterine horns are about the size of a pinky. I don't think that anyone has managed to find them or the uterus on an ultrasound yet. So that left researchers with fecal samples.

When working with fecal samples, researchers are looking for steroid metabolites, or specifically testosterone and progesterone. There does seem to be a way to use these hormones to distinguish between pregnancy and non-pregnancy, but not between pregnancy and pseudo-pregnancy, where the body pretty much acts like it's pregnant without actually being pregnant. Researchers are also trying to figure out where all of the pregnancy loss is occurring within the polar bear's reproductive cycle using these hormones. Knowing where the loss is occurring might lead to a way to have less pregnancy loss.

A polar bear's reproductive cycle is different from ours. For one thing, they are induced ovulators. So unlike humans, who ovulate about once a month regardless of what else is happening, polar bears will only ovulate if actually stimulated by a male to ovulate. They also have a period called diapause, which is a delayed implantation of the fetus in the uterus. Polar bears are seasonal breeders, with the peak breeding season between March and May. The embryo enters diapause throughout the summer, and doesn't implant in the uterus until around September or October. After implantation, there is about a 60 day gestation, with the baby being born around December. Research has found that testosterone spikes in females around ovulation and breeding, and progesterone spikes around the time of implantation and levels remain high until birth. These hormone spikes also occur in pseudopregnant females. A non-pregnant female pretty much just flatlines with her hormones throughout the year, with no spikes.

The next step is trying to use fecal proteins to distinguish between pregnancy and pseudopregnancy. Fecal samples were broken down and the proteins run with gel electrophoresis to separate them, and at the end researchers found that there are 5 proteins that were consistently more abundant in pregnant samples compared to non-pregnancy fecal samples. All of these fecal samples were retrospective, to be sure that it wasn't a case of pseudopregnancy. And 2 out of those 5 proteins have recognized roles in pregnancy- carboxypeptidase B and transthyretin. Transthyretin is produced by the placenta in early pregnancy. This may end up being a way to distinguish pseudopregnancy from an actual pregnancy.

Another method being looked at is actually the use of Sniffer dogs. Dogs are currently used for the detection of a lot of different things- anything from drug dogs to dogs that sniff out allergies and pull their owners away, to dogs who can distinguish people with colon cancer from those without it. So there was an idea to see if dogs could distinguish between pregnant and pseudopregnant females by feces. So far a little beagle named Elvis is distinguishing pregnant from pseudopregnant females with a 95% accuracy rate. He will be traveling around zoos this coming breeding season to try and predict which females are actually pregnant, and then we'll just have to wait and see which bears cub in December. Unfortunately though, there still is no way of telling if the bear is going through pseudopregnancy or if she lost the pregnancy.

Another thing being looked at is semen collection and artificial insemination. In the past, electroejaculation was used on male bears, which works well in other species but not at all in polar bears. It's believed that all of their blubber gets in the way. Now researchers are looking at chem-facilitated collection, where medetomidine is given to the bears, which causes semen to pool in the urethra. This can then be collected by catheterization. There is no urine contamination with this procedure, and it's fast- collection time is only 3-4 minutes. So far there has been really great success with this method. The semen can then be used to artificially inseminate a female, or be frozen for future use.

Researchers are also looking at which drugs to use to induce ovulation in females. On their first female they used ECG (equine chorionic gonadotropin) and porcine LH (luteinizing hormone), which is the standard in tigers. The female this procedure was used on did exhibit nesting behavior, but never produced cubs. No one knows if it was a pseudopregnancy or if she lost the pregnancy.

Recently at Sea World San Diego, one female was bred naturally and another was bred by artificial insemination. The bear was given 2 doses of ECG separated by 4 days and was given GnRH (gonadotropin releasing hormone) at the time of breeding. Sea World has their animals and staff much better trained at collecting samples- their dolphins are trained to pee in cups for urine samples and to present their tail fin for blood collection- so they are able to collect both urine and fecal samples. So far both females are exhibiting nesting behavior, so everyone is waiting to see if there are any cubs this December.

Overall, there has been some really exciting progress. No one had ever artificially inseminated a polar bear before, and even though it was unsuccessful researchers learned a lot about the female reproductive tract in females, when before we had known literally nothing. And with populations continuing to decline in the wild, every effort to help perpetuate the species is important.


Researchers from CREW ultrasounding a polar bear


Researchers at CREW ultrasounding a polar bear


Volpicelli Artwork

My husband has recently started doing "Word Art", where he uses lyrics and quotes to create portraits. It all started out just as an idea for an art project for school, and he had no idea if it would actually work or not. But it worked out better than he ever thought it could, and now it's taking off! The artwork is truly amazing. 

Here are some samples of what he has done so far.

Portrait of Malala Yousafzai, a woman known for her education and women's rights activism in Pakistan. She survived an assassination attempt by the Taliban in 2012 and has since been nominated for the 2013 Nobel Peace Prize. She was also the first recipient of Pakistan's first National Youth Peace Prize.

A commissioned portrait of Pope John Paul II


A portrait of Israel "IZ" Kamakawiwo'ole, a Hawaiian musician best known for his medley of "Somewhere Over the Rainbow/What a Wonderful World"


A portrait of Maxi Jazz, the lead singer of the British band Faithless. 


A portrait of Thich Nhat Hanh, a Vietnamese Zen Buddhist monk and anti-war and human rights activist. Martin Luther King Jr. nominated him for the Nobel Peace Prize in 1967.

An unfinished commissioned portrait of a friend's son. But it's looking really good so far, and it's one of the first ones done in partial color.


I love the way these word art pieces look! I'm trying to get my husband to do one of our lizard Sydney, but he's had so many requests that it looks like that one will have to wait. And these portraits helped secure him a job teaching a portrait art class at our local community center! It's always nice to know that hard work and persistence pay off =]

If you're interested in having a portrait done, the current prices are listed below. You can also contact him at volp91w@yahoo.com for more options. And if you want to see more of his artwork that isn't word art, his website is Master Portraits.


Sizing and Color Options

Wednesday, September 11, 2013

Solio

Before I went to South Africa I did a ton of research into the illegal ivory trade, and I still try to keep up to date on what's going on. But my interest had solely been focused on the elephant ivory trade, since I love elephants and hate the thought that they're being killed just for their teeth. But I never really focused that much on the rhino ivory trade, just because I didn't like rhinos as much I guess.

That all changed after two days working with rhinos in an active conservation effort. You can't spend all that time with rhinos and not appreciate them. I see rhinos in a completely different light now- their speed and power is unbelievable, and they are just magnificent creatures. And while in South Africa I learned some very alarming facts, including that rhinos are being poached at a rate of about 75 a week. 75 rhinos a week getting their face hacked off for what is essentially fingernails. 75 rhinos a week... that's nearly 4,000 rhinos a year. There are an estimated 20,000 rhinos left in South Africa, so at that rate the rhino could be extinct in as little as 5 years, if something isn't done to stop the trend.

I'm more interested in the ivory trade and conservation efforts than ever before. There seems to be promising signs- governments are taking more active roles, for example- but the black market ivory trade is like a chronic disease that is going to take a long time to fix, and it's going to take even more time for the populations to bounce back. There are a lot of people who are making small changes every day trying to help halt the disease spread, and that's what I want to be a part of.

I always admired the David Sheldrick Wildlife Trust and the work they do for conservation; I still foster two elephant orphans with them, who are both doing well. The trust is always looking for injured or abandoned orphans to take in and raise to be able to release back into the wild. They mainly take in elephant orphans, but occasionally they get called out for a rhino, too.

I believe that currently they have two rhino orphans, Solio and Maxwell. It takes a lot to care for a rhino orphan. This description of duties is directly from their website, http://www.sheldrickwildlifetrust.org.


"When rearing rhino orphans, it is important to:
  1. Replace the Mother Figure with several Keepers, so that the baby will follow more than one person and will not be reliant on just one, which will lead to problems should that person have time off.
  2. Protect the calf at night for the first three years, initially in a small stable, and later on in a spacious Stockade. Place an article of the Keeper's clothing in with the calf so that the familiar scent is there.
  3. Bottle feed a small calf four hourly throughout the day, but not at night, the last milk feed being at 6 p.m. When the calf is older and beginning to nibble on vegetation, anchor suitable cut greens within the stable at night and also offer a bowl of bran in which minerals are mixed as further supplementation.
  4. Walk a calf around dungpiles and urinals of the established wild community on a daily basis from dawn until dusk giving it time to investigate scent trails and contribute to the dungpiles. Allow it to eat the dung of the other animals (which all rhinos do) and which establishes the stomach bacteria needed.
  5. Take the calf to water and a mudwallow on a hot day so that it can drink and then lie and roll in the mud. Plaster the body in soft mud, which seals moisture in the skin, protects the animal from biting insects and sun. Mud is part of good skin care in all animals that do not have fur.
  6. Move a growing calf into a spacious Stockade at night once it has outgrown its Nursery quarters, because large animals become claustrophobic if confined too closely. Be sure to take its dung and establish a dungpile within the new quarters and also have a Keeper handy to calm the animal. Rhinos are creatures of habit and routine, and any break in the daily routine or happening is traumatic.
  7. When the calf is 3 or 4 years old, the Stockade doors can be left open at night, so that the calf can venture out and make physical contact with the other rhinos if it so wishes, but it is important that it can return to something familiar ("Home Base") whenever it feels the need to do so. By then, it will no longer be dependent on its Keepers, but will always respond to them. For instance, when Scud, as an adult, returned home injured, only her erstwhile Nursery Attendants could handle her.
N.B. Little rhinos are very playful, but must learn the boundaries of acceptable playfulness around humans. Therefore, discipline must be meted out in early infancy whilst a calf is small, initially with a sharp tone of voice and then the word "NO", and if necessary it can be reinforced by a prod on the nose from a small electric Cattle Prod powered by two torch cells. Rhinos are very easy to discipline, and are not normally disobedient in the same way as are elephants, so the electric prodder will only have to be used probably once or twice. However, whenever a rhino begins to gallop around playfully and becomes excited, it is a good idea to keep well out of the way!"

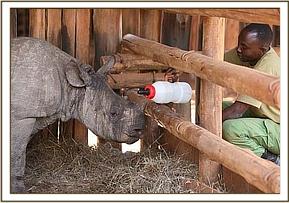
It takes a lot of patience and dedication to bring up an orphaned animal. If I had the time, space and money I would love to adopt them all and do something similar myself. Since I can't, I still like to do what I can. Which is why in addition to Quanza and Kanjoro, I now foster Solio. Solio was found standing over her mother, who had a shattered shoulder and was unable to stand or protect her calf. It's not clear if the injury was from a poaching attempt or not, but it would not be unheard of it it were. Some rhinos do manage to survive the immediate poaching attack, only to die of their wounds later. So Solio was brought to the orphanage when she was somewhere between 6 months old to a year old in 2010, and she's been there ever since. This month is her 3 year anniversary being at the orphanage, and she seems to be doing very well. She comes and goes from her stockade as she wishes, which is the beginning of the re-introduction process to the wild. She has her own space at the stockade, and she comes to eat and visit the other rhino, Maxwell, every couple of days or so. This July she was gone for a week before returning to the stockade, which the Keepers took as a good sign that she has been able to establish her own territory and that she is being accepted by the other wild rhinos. This is a great step towards her reintegration back into a wild life. 


When Solio first came to the orphanage, she was very feisty, and the keepers couldn't get near her to bottle feed her. That has changed as they earned her trust with their compassion and constant care.


Solio today


Tuesday, September 10, 2013

Equine Medicine


When I signed up for the advanced equine medicine elective I was expecting just a once a week lecture on something that involves horses. Maybe I'm biased, but I don't feel like we get a lot of information that relates to horses, it feels like a lot of small animal. But I'm sure the small animal lovers feel like we get too much large animal. We definitely get more equine than exotics, which is why I'm taking two exotic electives, but I'll save that for another post. 

Anyway, I expected the class to be just sitting in a classroom listening to, I don't know, common equine diseases or nutrition or something along those lines. Instead I was pleasantly surprised that for the majority of our class periods, we'll actually be spending them in the teaching hospital working on horses. And not just watching other people working on horses like all the intro to clinics classes, but actually working on them. Finally, some more hands on experience. 

Last week it was lameness exams, and this week it was jugular catheters and urinary bladder catheters. Lameness exams are extremely routine in equine practice, so even if you're just interested in horses you probably know what a lameness exam entails. Horses are always going lame, which just means they're not walking right for one reason or another. And if you're doing it in Oklahoma, you definitely want to be the one watching the horse and not the one jogging it in the 100 degree heat. But basically all a lameness exam entails is jogging the horse and trying to see which leg it's lame on. There are a couple tricks to help- the horses head will bob up on the lame leg if it's in the front, and the hip raises on the lame leg in the back. Sometimes the lameness is subtle, so you can use a flexion test to try and exacerbate the lameness and make it more obvious. For the flexion test, you have to isolate each joint and jog the horse after each joint flexion, otherwise it wouldn't help you narrow down which part of the leg was the cause of the lameness. If the lameness is coming from the joint you’ve just flexed, they will be noticeably more lame on the next job.

If the lameness is in the front legs, for the majority of the time the problem is going to be in the feet. Even if it looks like it’s coming from somewhere else, say, the shoulder, a lot of the time the horse is just trying to compensate. If the lameness is in the hind legs, and lot of the time the problem is in the hock joint (the equivalent of our ankle). If there is lameness in both the front and the hind limbs, look at which sides of the body they are on, and that can give you a clue as to which is the primary lameness and which one is compensatory. If the limbs are lame on the same side of the body, it’s more likely that the primary lameness is in the front limb. If the horse is lame on the diagonal, such as the right front and the left hind, it’s more likely that the primary lameness is in the hind limb. These don’t hold true for every case, but it’s always a good starting point.  And you just have to train your eyes to watch the entire horse as it moves to pick up the clues, as not all lameness are obvious. Most of the time a horse is completely sound while walking, and you might only pick it up intermittently while jogging/trotting.

That’s pretty standard procedure for horse care. If you own a horse, at some point it will be lame. So I was pretty excited to do a urinary bladder and jugular catheter, because that I don’t get to do every day. Not that I do a lameness exam every day either, but when I was shadowing vets I did quite a few of them, and I was always the one who got to jog the horse. I got a lot of exercise those summers.


Although something new that the school was doing that I like was using a sensor system during the lameness exam. The horse gets a little head mask with a sensor, a sensor around the ankle, and a sensor on top of the hips. Then when you jog the horse, it sends the information to a computer that tells you where the horse is lame after monitoring its movements. I’m not sure how well the system works, since this was the first time I’ve seen it used. But I do know one downfall is the sensors can’t tell a pacer from a trotter, which would reverse your lame leg if it was in the hind limbs, and it can’t tell if your jogging straight or in a curve, which would affect your lameness score. But those are pretty minor details.


To insert a urinary bladder catheter you have to use sterile technique, which means just cleaning off the vulva before sticking your catheter in. It’s always fun when, right after you’ve finished cleaning, your horse decides it has to go to the bathroom. Then you get to start all over. When you’re ready to go, you have to slide the catheter into the vulva and try to find the little slot leading to the urethra. It feels like a little knob, and if you poke it your finger should slide right in. I found it was easiest to stick my middle finger in, and then slide the catheter in under my finger a bit, before removing the finger and sliding the catheter in more. You don’t really have to go that deep at all- as opposed to all of the artificial inseminations I did where I was literally up to my shoulder in the mare, placing a urinary catheter really only puts you in up to your wrist. That’s a good check to make sure you’re not going to the wrong place. And then you just keep sliding the catheter in until urine comes out. You should pay attention to where you’re holding the other end of the catheter, or you may end up spraying urine all over your shoes or shooting it at the person standing next to you, which I almost did by accident.

For the jugular catheter, it’s the same theory as in dogs and cats except you get a bigger vein to hit. Unfortunately, that vein likes to fill very slowly in some horses, making it more difficult to see. You always want to insert the catheter in the jugular groove, where there is muscle underneath the jugular vein that helps protect the carotid artery. The very last thing you ever want to do is hit the carotid when you’re aiming for the jugular.

Horse skin is pretty thick, so you have to use a good jab to get the needle going in. Then once you get the flash (blood coming out of your catheter), you slowly advance the plastic, flimsy catheter off of the metal needle further into the jugular vein. And that’s all there is to it. Be prepared to get blood all over your hands though when doing this, just because a horse is pumping a lot of blood, and you don’t have anything to stop if from coming out when you don’t have anything hooked up to your catheter.

I love getting hands on experiences like this. First, because it’s always so much more interesting that sitting in a classroom just listening to the theory on how to do something. But it also stays in your brain better once you’ve actually done it. Because you could tell me what it feels like to insert a urinary catheter as many times as you want and how to do it, but until I can feel that little bump and slot for myself, I’m still going to struggle the first time I do it. So basically, I feel like I’m just eliminating a step and getting further ahead by doing so.

I can’t wait to see what else we’ll get the chance to do this semester.  


Friday, August 30, 2013

Junior Surgery

I think it's safe to say that junior surgery is the class that everyone looks forward to the most, but fears at the same time. Nothing really gets your adrenaline going like knowing you are about to be responsible for a life and you have absolutely no idea what you're doing.

Junior surgery gets divided into two phases- cadaver and live surgeries, mostly spays and neuters. You would think it would make sense to have your cadaver surgeries before your live surgeries, to learn how to actually perform the surgery. Apparently the size of our class makes that impossible though, and I was one of 12 lucky people to have our first live surgery scheduled before having any of the cadaver surgeries. I was pretty close to a full on panic attack, and all I could do was obsessively read the lab manual and hope I understood what was going on and what to do.

For my first live surgery, I was one out of two anesthetists for the group. We performed two surgeries, a spay and a neuter. One anesthetist has the role of the main anesthetist for one surgery while the other is the recorder, writing down all of the patient's vital signs on the anesthesia record, and then for the next surgery the roles switch. I was the main anesthetist for the first surgery, a neuter of the cutest little puppy named Marty. Obviously, I was terrified of doing something wrong.

The first thing I had to do was induce Marty, which just means giving him the drugs to knock him out. The day before the surgery was scheduled I came into the hospital to prepare all my drug dosages for the mixture of Telazol, Butorphanol, and Dexmedetomidine. This is just a quick IM shot into the quadriceps (thigh muscle), but apparently it's pretty painful, because all of the dogs yelped when they got their shot. This didn't help my nerves or my confidence. But the next part was easy, just petting Marty until he got sleepy and laid down on the table.

Then I had to get the catheter in. I've never put a catheter into a small animal before, let alone a puppy. I'm used to giant horse veins, which you'd have to be blind to miss. Even after all my blood work in Africa I wasn't too confident, because even a sable's ear veins were larger than Marty's cephalic vein. It was easier getting the catheter in though than it was trying to take blood from him the day before the surgery though, because at least he wasn't squirming around. I didn't hit the vein on the first try- that would have been a miracle- but at least it only took one stick and some wiggling the needle around. I always feel bad when I have to continuously have to stab to hit the vein, especially since I hate when nurses do that to me.

After the catheter is secure I had to pick out an endotracheal tube. That was an adventure. I had absolutely no idea how to appropriately size an endotracheal tube. I grabbed like 4 different sizes and brought them all over to hold up to Marty's neck. Of course, they don't differ so much in length, but in diameter, so that didn't help too much. You want the largest diameter size you can fit without traumatizing the mucosa, and I still don't get how you know what that is. I guess just practice. I got the right size with the help of an anesthesia tech, and then I managed to slip the endotracheal tube down between the arytenoids and into the trachea. Now I was feeling a little more confident.

We finished setting up all our equipment after turning on the oxygen, and then we prepared to move from the induction room into the surgery lab. All of our animal shelter live surgeries take place in junior surgery, where our labs take place as well. We wheeled Marty in and got him hooked up to the anesthesia machine and got all of his monitors on. Now for the duration of the surgery it was my job to make sure Marty didn't wake up. I had his oxygen flowing, I had the isoflurane on, and I was constantly checking his blood pressure, pulse, and respiration. I gave him a sigh breath (manual breath) every 5 minutes or so, and if I thought he was getting a little light I would up the isoflurane. To check that he was still under and wasn't getting light, I obsessively checked his palpebral reflex and eye position. For the palpebral reflex, you tap the inner corner of the eye. In the awake dog when you do this, the dog blinks. If the dog is under anesthesia there should be do palpebral reflex. The eyes should also be pointed ventral, or looking down. So if I saw a little bit of a blink, I upped the isoflurane until I felt I could bring it back down again. My nerves went away during the surgery and I stopped worrying that I was going to kill the patient, but it did take constant attention and adjustment to keep Marty's levels good.

After the surgery was done, and I had turned off the isoflurane, it was my job to sit with Marty until he woke up. For such a little dog that had seemed to be not so deep at all during the surgery, he took a long time to wake up. He almost went past the 30 minute mark, which then would have to be marked down as a complication. But I can't complain; I got to sit there cradling him and rubbing his back, waiting for him to either cough or swallow so I could pull the endotracheal tube out. Then I carried him into recovery. I don't know how anyone goes through junior surgery, let alone the animal shelter rotation, without wanting to adopt every dog that goes through the program.

For the second surgery, a spay on a puppy named Topaz, I was the recorder. So I didn't have to place any catheters or endotracheal tubes, I just helped hold Topaz in place for them. And during the surgery, every 5 minutes I just had to record blood pressure, pulse, respiration, end tidal CO2, saturated O2%, and the flow levels for oxygen and isoflurane. And every 15 minutes I took a temperature. This was definitely much less stress than being in control of the anesthesia machine, plus I didn't have the nerves or stress that comes from not knowing what to expect or what to do. So I just stood a little off to the side, and every 5 minutes I checked all my instruments and wrote the values down. Not bad at all. Until Topaz decided to wake up halfway through the surgery and had to be given an extra shot of propofol through her catheter. That was some excitement I could have done without. But at the end of the day, both Marty and Topaz had successful surgeries and were able to go home immediately afterwards.

The next week I had two surgery labs, where I would be acting like the assistant surgeon and primary surgeon for our cadavers. On our first lab we did a spay, celiotomy, and placed a chest tube. For the second lab we did a neuter, gastrotomy and gastropexy. Celiotomy just means we explored the abdomen. For the chest tube, you have to force a tube through the thoracic wall into the thoracic cavity. It's an emergency procedure used to eliminate any excess air or fluid that's in the thoracic cavity. A gastrotomy is opening up the stomach, which is a procedure that's rarely performed, but might be done if an animal ingested a foreign body. Gastropexy is suturing the stomach to the abdominal wall. It's done mainly to prevent GDV, which is a life-threatening disease in dogs where the stomach kind of twists up on itself.

The first lab took forever, because again we had no idea what we were doing. Our first incision was not so pretty, and neither was our attempt to suture it back up. Our spay was also not the neatest job in the world, but at least it was done, and would have been a completed, successful surgery if it had been done on a live dog. It took us forever to suture up our incision, since for a spay you normally make a super small incision, but for a celiotomy you are cutting from the xiphoid to the pubis, or the entire abdomen from the rib cage to the hips. We were still trying to figure out the suture patterns, and since we were supposed to be using a simple interrupted pattern, that just naturally takes longer.

Our second lab went much smoother. Now we knew what to do, which helped a lot. Our initial incision still wasn't perfect, but it was better. At least it was through the linea alba, or the thin white line where the abdominal muscles join together, and not through muscle. The technique behind a neuter is pretty much the same as the spay, so now we knew how to use the three forceps technique and how to tie our transfixing knots and were able to move through that quicker. Plus a neuter is always just faster than a spay. The gastrotomy required a new suture pattern, the Lembert, which makes the stomach lining invert on itself to produce a better seal. But by halfway through closing that incision I really got the hang of it, so not only did it go smoothly, it looked pretty good. Same with the gastropexy; once it got going we were on a roll, and it looked good too. Our closing also went much smoother- our suture knots were much neater on the closing of the external rectus sheath. Our simple continuous pattern for the subcutaneous layer (which we couldn't even do the first lab because of our botched incision) looked consistent, and our skin closure had a little bit of puckering but overall wasn't too bad, and was still much better than our first attempt. I finally get why they make us do so much suturing and so many knots; it it so confusing at first and easy to overthink and mess up, but the more you do it the more it becomes second nature and you stop thinking and just let your hands move. By the end of the second lab I was even getting the pencil grip of the forceps down better, something which I can assure you does not come naturally.

I still don't feel like I really know how to do a spay or a neuter, but I definitely know more than I did a week ago. And I definitely know how to suture now, though the incision could still use some work. I have a little bit of a surgery break, but pretty soon my schedule is going to be nothing but surgery. I have all of mine this semester, which I think I'll appreciate next semester. For this class we have 7 surgeries as the anesthetist, and on our last one we play the role of both anesthetist and recorder for both surgeries. We have three surgeries as the assistant surgeon, and three surgeries as the primary surgeon. I'm still nervous for those. I really have to work on my aseptic technique, which we practice in our cadaver labs but it's easy to forget or ignore, since we usually mess up so much since we're still learning it. At this point I think that's actually what I'm most worried about. I think (and hope) that with three surgeries being able to watch a 4th year perform the procedure correctly I'll be able to do them myself as well. And then at least I can say I can do it and feel confident about it.

Tuesday, August 20, 2013

Sable, Sable Everywhere

One of the most commonly worked on animals in South Africa, at least for us, was sable. Apparently sable, which are in the antelope family, were almost extinct in South Africa, and they are now being bred back on the private game reserves. There was a huge sable sale in August, and since we were there in June, we had a lot of sable calls.

Working on the sable reminded me a lot of working on cattle here in the states, except we don't have to chase cattle around in trucks and dart them in order to work on them. But sable in South Africa are usually kept fenced off in sections of the reserves to protect them from other animals, and a lot of the same type of care goes into them. They even get ear tags like cattle do.

All in all, the sable are relatively easy to dart. They are so used to people that they really don't start running until the dart gun has been fired. And even then they don't always run far. In fact, sometimes we had to chase the rest of the herd away from the sable that was darted and went down.

When dealing with a darted sable, you always want to put pipes on their horns. Sable tend to swing their heads around a lot as they're being carried, and if you're working on them on the ground they can't hold their head up by themselves. And we had one member of our group take a pipe right in the neck, and you can bet he was grateful it wasn't the actual horn.

Once the sable have been darted and the horns taken care off, there is a pretty set routine. Each sable was given anti-parasitic (doramectin) and a vitamin complex IM, and each sable also has blood taken from their cephalic vein (on the front leg) and has hair pulled from the tail for DNA testing. Each sable also gets a shot of penicillin to help prevent infection, as the dart entry sites and other injection sites can't easily be cleaned or monitored.

Testing the DNA in the sable was of particular interest to the reserve managers, and on some sable that was all we did. We used a special dart that had a little claw on the end of it, which would stick to the sable, grab a tuft of hair, and then fall back to the ground for us to collect. The breeders are trying to breed bigger horns on the sable, so as well as DNA testing, the horns are always measured as well. And the horns are measured by not only their entire length; the tip lengths, the number of rings,  the tip to tip and the base length are all important as well.

Sable that are going to be going to sale are moved into bhomas, which are like pens without the reserve, so that the sable can get used to being fenced in more before the stress of the sale. This is not easy. Sable are heavy. In one day we moved 14 sable, and believe me, you feel that by the end of the day. And you have to watch them; one sable ninja kicked me in the back of the knee while we were driving it to the bhoma, and then one of the reserve workers had to sit on it for the rest of the ride to keep from kicking. I learned a very important lesson that day- always volunteer to hold the head of the sable. It's much better to be slobbered on than kicked. And then all you have to do is hold their head up and make sure they keep breathing.

The trickiest part is actually moving the sable into the bhomas, because sometimes it involves carrying sable down long narrow corridors. And it takes usually about 7 people to carry a sable- 3 per side and then one person holding the horns- and usually it's hard to fit everyone into the corridor and be able to move effectively. And as I said earlier, sable are heavy. But after some experimenting, I think it was easier to just carry them down rather than reverse them and hope the sable will walk down themselves, because sometimes they just don't feel like doing what you want them to do. But when you're ready to reverse them, wherever that may be, sable have very nice ear veins that are used for the reversal. And then you just remove the pipes from their horns and leave them alone. It's much easier doing all of this with them being left in the field than transporting them to a bhoma, but sometimes that's just what you have to do.

That kind of procedure is what we did the most off, but like I said, the sable are treated a lot like cattle. So we were called out to look at some for lameness and abscesses as well, which usually just involves more antibiotics or antibiotic wound spray. And for one sable with a lung infection, all we had to do was fill the dart with antibiotic instead of our regular sedatives, and that was the administration of the drug. Then all we had to do was collect the dart. We also did some pregnancy checks on our very last day. Only one sable required an actual ultrasound, and the rest were done by rectal palpation. By palpation you are able to feel a thicker uterine horn on one side. It's easiest to feel pregnancy around 4 months, which is also when an ultrasound is able to pick up a pregnancy.

The first day we worked on sable, I wasn't overly impressed. I wanted to work on the exotic wildlife, and sable really didn't seem all that exotic. By the end though, I thought they were super cute, and if they weren't endangered I would have loved to bring a sable home with me. Preferably the tame orphan.

The sable are known for having a painted face

Giving a sable a shot of penicillin in the butt

Collecting the hair and skin off of the dart for the DNA testing

A closer look at the DNA collection dart

Collecting blood from the cephalic vein

A closer look

Performing a rectal palpation for a pregnancy check

This was the sable that ninja kicked me, and had to be sat on for the ride to the bhoma

Giving the IV reversal in the ear vein


Monday, August 19, 2013

Save our Rhinos, Hunt a Poacher!

I really wanted to do a more in-depth description of the work I did with the rhinos in South Africa, because I really do feel that those two days were the most interesting. And they were the two days where I really felt that I was contributing the most to the wildlife conservation cause.

The whole idea of the rhino horn infusions is to make the ivory worthless on the black market. Of course, you can't tell that the ivory is worthless just by looking at the rhino, so the whole hope is that the procedure will spread by word of mouth, and poachers will know that rhinos on the reserves have been treated and that they'll go somewhere else. And so far, to the best of my knowledge, none of the treated rhinos have been poached, so it's hard to say whether the treatment is effective or not.

The treatment itself involves darting rhino from a helicopter (they are darted with 4 mg of etorphine, which is essentially morphine x 10,000), and once the rhino goes down holes are drilled into the horns in order to attach the hoses for the transfusion. A rhino's horn is keratin, the same material that makes up human fingernails, so they don't feel it. The infusion is a mixture of an ectoparasiticide and an indelible dye, or an indestructible dye. An ectoparasiticide is basically a medication that we would use on animals to treat and prevent fleas, ticks, and so on. The one used in this procedure is an organophosphate. Since some of the myth around rhino horn is that by ingesting it you can be cured of anything from headaches to cancer (this is an especially popular belief in Vietnam), the idea of injecting this parasiticide is that when humans ingest it, it will make them physically sick and not want to try it again in a hurry. The dye that is injected stains the ivory pink, and makes it worthless for carving. So overall, the entire procedure is designed to ruin the value of the horn by making it worthless for decoration and toxic to ingest.

There is some debate among veterinarians as to the effectiveness of this procedure, but I think that since it is still so new it will be a while before there is any data either for or against it. Some veterinarians are still in favor of dehorning, as a rhino's horn is able to regenerate itself in about 6 years. This procedure was created to try and prevent dehorning, as rhinos are such a huge part of the tourism industry in Africa. A rhino's horn is porous, and the infusion is thought to last for 4 years.

While doing the infusion, microchips are also inserted into each horn. The holes are then stuffed with putty and wrapped with duct tape. This allows the research teams to monitor the rhinos and the ivory, should the rhinos be poached. Each rhino also received an ankle tracking collar as well as an ear notch.

While doing all of these procedures, it was our drop to monitor respiration and pulse on the rhinos. We weren't able to help with the actual infusion since it is toxic. We measured the respiration by holding our hand in front of the rhino's nostril and counting breaths. The respiration on the rhino should be between 8-20 breath per minute as the widest range, but we were trying to keep it more in the 9-12 bpm range. When the respiration drops too low (we had one that dropped to around 6 breaths per minute) the rhino is given a shot of butorphanol in the ear artery to help wake it up a bit. The pulse on a rhino is actually taken on the inside of the ear. The normal pulse for a rhino is around 37, according to one of the vets in charge of the infusion procedure, but when they are under etorphine their pulse goes up to around 60, and that's where you want it. When the rhino becomes stressed, the pulse can get as high as 150. And as a fun fact, a rhino's body temp is slightly warmer than ours at 37-38 degrees C, or right around 98.6 degrees F. Because the days in Africa get so hot, even in the winter, we had to consistently pour water over the rhinos during the procedure to help keep their body temperature down.

The last part of the procedure we got to help with make have actually been the most fun- rolling the rhinos. This procedure is done with the rhino laying laterally on its side. However, we don't want the rhino laying on the same side for too long, or it can start to impair breathing and damage the lung. So halfway through each procedure we rolled the rhino onto its other side. This was quite an event that took about 7-8 people to manage. But then you get to say you flipped a rhino. And rhinos are actually quite efficient breathers, so I'm not sure how long a rhino would have to be laying on its side before damage occurred. But each rhino also got an oxygen tube as an added precaution.

When I first arrived in Africa, I was really only interested in rhinos in that they were part of the "Big 5". But after working with, I really love them. They are just such awesome animals, and there is nothing else like them on this planet. I'm really hoping that either the dehornings, this infusion procedure, or a combination of the two can help save South Africa's rhinos. Currently, about 75 rhinos are being poached in South Africa PER WEEK. Those numbers are just out of control. Our very first call out in South Africa was for a rhino poaching incident. So far about 200 rhinos have had this horn infusion, and considering we only managed to do 4 per day, that's a lot of work. The eventual goal is to do 6000-7000 out of the 20,000 rhinos still left in South Africa.


A rhino right after being darted.


Rolling a rhino onto it's other side


Checking respiration

The red line is the oxygen tube

Drilling into the horn for the infusion tubes

Attaching the infusion lines


Checking pulse on the ear veins

Our SA Worldvets group with a rhino